Introduction
This is a step-by-step procedure for creating an application for jogging your Buildbotics CNC with an Android Phone. My development system is a desktop computer running debian linux and my phone is a Pixel 8. This procedure utilizes the React Native applications development framework. Other combinations of development systems and android phones will be very similar.
Besides the phone and development system, all you'll need is a USB cable to connect your phone to your development computer.
Note - The development process for IOS phones should be similar, but I haven't tried that.
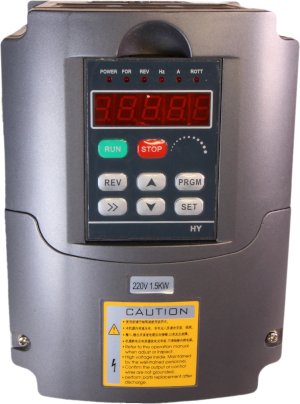
Check out my blog posting titled Introduction to the Buildbotics CNC Controller API to learn about the Buildbotics API.
Step 1 - Set up your computer for developing react-native applications.
- Open a terminal in the folder where you want the root folder for the app to reside.
- Ensure that node.js and npm are installed on your system
sudo apt update
sudo apt install node.js
sudo apt install npm
- Tell npm to put commands in ~/.global/bin. This only needs to be done once for your system. Then add the .npm-global/bin to your path.
npm config set prefix '~/.npm-global'
export PATH=$PATH:~/.npm-global/bin
Then, add the following line to your .bashrc file.
export PATH=$PATH:~/.npm-global/bin
- Download and install the command-line-tools from Android Developer Studio. In my case, I downloaded the file called android-studio-2024.2.2.15-linux.tar.gz. Then, extract the files to the Android/Sdk directory under your home directory. Then add these lines to your .bashrc file.
    export ANDROID_HOME=$HOME/Android/Sdk
    export PATH=$PATH:$ANDROID_HOME/tools:$ANDROID_HOME/tools/bin:$ANDROID_HOME/platform-tools
- Then reload your .bashrc file to ensure your current paths are correct.
source ~/.bashrc
Step 2 - Prepare your phone
Enable developer options on your phone. In my case, I have a 'pixel 8' phone and the developer options can be enabled by going to Settings->About. Then tapping 'Build number' several times. Then, go to Settings->Developer options. I did not find a link directly to 'Developer options', but I did find it by searching for the word 'developer' in Settings. Then enable 'USB debugging'.
Step 3 - Connect your phone to your development computer.
In my case, this required a USB C to A cable. I didn't have one, so I had to go to a local store and buy one.
You may be prompted by your phone to confirm that you want to allow USB debugging.
Step 4 - Make sure the ADB server is running and sees your phone.
The Android Debugging Bridge (ADB) handles communications between your development computer and your android phone. Enter these commands from your terminal.
    adb kill-server
    adb start-server
Verify that your development computer sees your phone by running the following command from your terminal. You may be prompted by your phone to accept the request.
adb devices
You should get a response like: '4A072DEJH001A2 device'.
If it says your device is 'unauthorized', check the phone for a prompt to authorize the connection, allow it, and run the command again.
Step 5 - Create an new project.
From the directory where you want your new project directory to reside, enter the following commands.
    npx @react-native-community/cli init Buildbotics
    cd Buildbotics
This will create a project in a directory called Buildbotics and then move into that directory.
Add the following section to the "dependencies" section in package.json file in the Buildbotics project root directory.
  "devDependencies": {
    "@react-native-community/cli": "latest"
  },
Now you have a default project built. To actually run it:
- Open a separate terminal and start the 'Metro' server.
npx react-native start
Then, in the original terminal run this command.
npx react-native run-android
After this command completes, the default app should appear on your phone.
The next few steps will replace the default app with the Buildbotics app.
Step 6 - Get the files for this project from github.
The files that you will need for this project can be downloaded from my Android-CNC-jogger github repository.
Step 7 - Move the files into your project directory.
- Copy buildbotics.ts from the github directory to the Buildbotics project root directory.
- Copy the layout.tsx file from the github directory to the Buildbotics project root directory.
- Copy the App.tsx file from the github directory to the Buildbotics project root directory, overwriting the existing App.tsx file.
- Copy the assets folder from the github directory to the Buildbotics project root directory.
- Copy the AndroidManifest.xml from the github directory to the Buildbotics project root at android/app/src/main/AndroidManifest.xml overwriting the existing AndroidManifest.xml. This step tells your phone to allow cleartext communications.
Step 8 - Install a library from react-native
Run the following command to install the react-native-paper library. This library is needed to run the radio buttons at the bottom of the screen.
npm install react-native-paper
Step 9 - Replace the app icon
It is recommended to use an icon that is 1024x1024. An image that meets this recommendation can now be found in the assets/images/icon.png directory.
![]()
You actually have to make several copies of this and place them in different folders. This is because the icon size depends on the size and model of the android phone.
I happen to have ImageMagick installed on my debian trixie and it comes with a command-line command called convert. With this, I created the following script:
convert $1 -resize 48x48 ./android/app/src/main/res/mipmap-mdpi/ic_launcher.png
convert $1 -resize 48x48 ./android/app/src/main/res/mipmap-mdpi/ic_launcher_round.png
convert $1 -resize 72x72 ./android/app/src/main/res/mipmap-hdpi/ic_launcher.png
convert $1 -resize 72x72 ./android/app/src/main/res/mipmap-hdpi/ic_launcher_round.png
convert $1 -resize 96x96 ./android/app/src/main/res/mipmap-xhdpi/ic_launcher.png
convert $1 -resize 96x96 ./android/app/src/main/res/mipmap-xhdpi/ic_launcher_round.png
convert $1 -resize 144x144 ./android/app/src/main/res/mipmap-xxhdpi/ic_launcher.png
convert $1 -resize 144x144 ./android/app/src/main/res/mipmap-xxhdpi/ic_launcher_round.png
convert $1 -resize 192x192 ./android/app/src/main/res/mipmap-xxxhdpi/ic_launcher.png
convert $1 -resize 192x192 ./android/app/src/main/res/mipmap-xxxhdpi/ic_launcher_round.png
Then, I saved the script as 'make_icons' in my ~/.local/bin folder which s part of my path.
Then, I ran the command from my project root dirctory like this:
make_icons ./assets/images/icon.png
Step 10 - Start the Metro server.
The Metro server provides the web server interface for development and communicates with the app on the android phone. If it's already running, kill it and run the following command. Note, this command does not return until you kill it (^C on from the linux command line), so it's best to run it from a separate terminal window.
npx react-native start
Step 11 - Build the app for the android.
The following command builds the app specifically for the android.
npx react-native run-android
Step 12 - Test the app in development mode
At this point the app should be displayed on the screen of your phone. It should look like this.
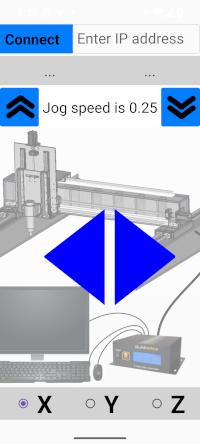
Now is a good time to try it out. Just enter the IP address for your Buildbotics CNC Controller in the input field at the top of the page and press the 'Connect' button. The host name should appear and the machine state (hopefully "READY") should also appear. If so, click the big triangle buttons to jog your machine. Select the axis from the X, Y, and Z buttons at the bottom of the screen. Adjust the jogging speed with the up arrow and down arrow buttons near the top of the screen.
Step 13 - Build the app for production and disconnect from the development machine.
Run the following commands to build the production app for the android phone.
    cd android
    ./gradlew assembleRelease
Now, move back up to the Buildbotics project root directory and install the production app on your phone with the following command.
    cd ..
    adb install android/app/build/outputs/apk/release/app-release.apk
That's it! Disconnect the phone from the USB cable. There should be a new icon on your screen that has the Buildbotics logo in it. Just touch that icon when you want to run the app.
Conclusion
As you know by now, we started from a default project, added a couple of source code files, replaced an existing file, and added a few images.
The source code files are written in TypeScript which is Javascript with extensions for type checking. Check out this tutorial if you want to learn more about TypeScript.
The source files are:
- buildbotics.ts - This file contains the code for interfacing with the Buildbotics Controller. Check out my blog post titled Introduction to the Buildbotics CNC Controller API to learn more about the Buildbotics Applications Programming Interface.
- _layout.tsx - This file manages the layout and widgets that appear on the screen of the android phone.
- app.tsx - This is the main app and manages communications between buildbotics.ts and _layout.tsx
Please consider joining the buildbotics forum and contributing to the Applications Development board.